Showing posts with label Garden. Show all posts

Wednesday, June 4, 2014

Galvanized Soaking Pool


As I type this, the chain link fence that surrounds our front yard is being dismantled.  There are little sparkling bits of light floating around my head right now I am so happy. Over the next few days the yard will be transformed from a dead grass lot to the beginnings of a wild, drought tolerant garden with horizontal slat side fences. Behind those fences is the next project, and while I am thinking mostly about the new back deck and raised beds, there's this other thing that I'm considering, a pipe dream, of making a soaking pool out of a galvanized livestock feed tub. If you think I'm crazy, just check out what other folks have done with this application.


I love the wood cladding around this feed tub pool in Santa Barbara. Standard round stock tubs are between 8 and 10' and 2' deep; deeper than a bathtub, enough to submerge at chest level. I'm researching the best way to keep this type of pool clean, so far I'm intrigued by the idea of a floating, solar powered filter.


Both of my boys are learning how to swim, Jasper can do laps, and Wylie is at the stage where he likes to dunk his head under water and doggy paddle around. While we head to the community pool for lessons and real swimming, on a lazy summer day it would be so nice to have something like this to play in, or to dangle your feet in on a hot day.


If I could just get my hands on a water silo we could really have something...dogs apparently like these pools. 


And this is just sweet...


Photo Credits:
bigBANG studio 
Doble M Design
The Cabin House 
Design Mom

Tuesday, May 27, 2014

The Front Yard- Part 1


If I haven't been posting as often lately, it's because of this. I bought a project. I optimistically took this picture the day the sold sign posted, before moving day, and before the important boxes were unpacked and a civilized, but very temporary amount of home decorating was done.  When the dust settled I began the researching and costing things out, making sketches, revising sketches, and meeting with all manner of house people from architects to tree guys. Despite the fact that I'm dying to do the inside, we decided that the most important thing to start with is the front yard. Psychologically speaking, it will make us feel more settled to drive up to a nice looking house.

When I first pulled up to the property with our realtor a few months ago I saw a chain link fence, a bald, badly topped tree, some gnarly rose bushes, and dense camellias covering the windows and spilling over the driveway.  I knew it killed the curb appeal for other potential buyers, making it easier for us to get the house. I was happy to look past the exterior, because I was so focused on getting a place that hadn't been flipped.  The interior was spotless and completely white, there was a brand new roof, new windows, and that giant backyard. When the inspections came back with no major items called, I knew we had found our place.  But driving up to it every day with it's chain link fence around the lawn and anemic gray paint job is a constant reminder of how much we need to breath life into it. So we it is here that we shall begin. 

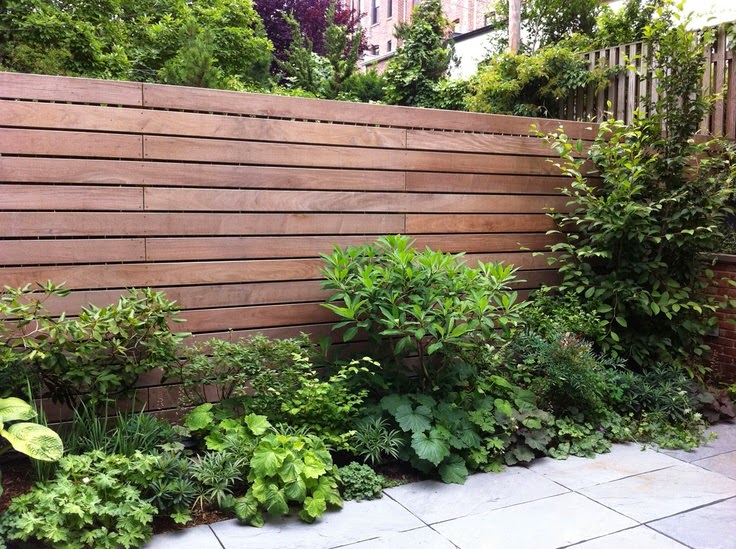
To note: I don't know anything about landscape design, I just know that I like the way it looks in Sunset magazine.  The most important things to me are that this new front yard is drought tolerant, easy to maintain, and has personality. I want lots of edible plants mixed in with native grasses, and flowers. I absolutely do not want a lawn- we are in a drought, and we have enough of that in the back. I want to build horizontal fences on either side of the front of the house to lengthen the front yard and add privacy to the back yard, and I need to block our neighbor's unsightly side yard/house from our view. Here are my inspiration photos:

I started to figure out what I wanted by looking at the yards around town. When I saw one that appealed to me I researched to find out the names of plants and flowers that I was drawn to. Then I started up with Pinterest. I searched high and low for drought resistant landscaping and native California grasses.  I made a board and creatively named it "The Yard". Then I made the calls.  I found the landscaper who does all the yards that I like around town and I had him come take a look.  While he was here, I had him identify all the the trees on the property, he gave me an overview of their health, a sense of what they look like throughout the year, and what type of maintenance to plan for.  We decided that I needed to cut some down, including the old, poorly topped magnolia on the front lawn, a tree that was probably planted when the house was built. I talked through my wants and needs with the new yard, and then it was time to call the tree guy.  When it came to cutting down trees and ripping out the existing landscaping, I was all bark no bite.  On the day the crane, and fleet of equipment showed up to remove it all, I felt really guilty. Someone probably really loved that tree at one point. I left for the day and came home to a bald, sun-scorched lawn with a chain link fence around it. This is what it looks like today with dead grass and no shrubs(cringe):


You've gotta tear it down to build it up. I go between really inspired and excited to overwhelmed and full of doubt. We have a lot of work to do, and we can't go spending all of our money on the exterior, which means we are going to have to do some major projects ourselves, like painting the house (anemic gray is not our color). Any suggestions? Wish me luck.

Tuesday, April 22, 2014

Wall Mounted Pinch Pots


Our new house is white walled, and I'm kind of loving it. I like the idea of bringing in little pops of color with art and accessories. I can easily swap them out when I want to change things up. Because our upper level has great light and beautiful tree-filled valley view, I really want the interior walls to come alive with flora to mirror the outside. I even bought a few large Shane Powers ceramic wall pots from West Elm for hanging ferns on the stairwell wall (me and those ferns). Using these large pieces as a point of inspiration, I made some tiny versions with polymer clay to hang in smaller spaces, like the bathroom, or over a bedside table. I think the granite pots look like river rocks.
 

After the pots are oven-baked, they can hold water for itsy bitsy flower arrangements. I scavenged these blooms from around our wild backyard. Slowly, we are making our new house our home! For the full tutorial read below.


Wall Mounted Pinch Pots - you'll need at least 2oz polymer clay per pot, and some 3M adhesive tabs for hanging.


Roll polymer clay into an egg shape.


Push the center to about 1/4" base thickness.  Then slowly open the bowl up.


Continue to shape the bowl until it is about 1/4 thick throughout,


Flatten one side to create a surface for hanging.  Bake on a wax paper covered baking sheet at 275 degrees for 30 minutes, until clay is set. 


Allow to cool completely before handling.


Apply an adhesive back, designed to hold up to 1 lb.  I used 3M's removable picture hanger, trimmed to fit. 

check out the 1968 counter top!

For maximum adhesion, hang and allow to set to the surface for up to 12 hours before filling with water and flowers/greenery.  


Monday, January 6, 2014

The January Home


It's January. I know this because the frozen air and my somber post- holiday mood is leaving me with the overwhelming desire to strip my house naked like a tree without leaves.  I love empty space.  I love simple, natural elements. I love air plants, and succulents, and leafy stems, and barnacle covered stones. I made a winter terrarium with them this week. I rinsed the barnacles with cold water and shook the moisture off, then put them on a wooden cheese pedestal with air plants- the moisture from the rocks keeps them hydrated- and covered them with a glass dome.  The air plants look like sea plants to me, and the whole thing looks decayed, and frozen.

January is also the time of year when I tend to contemplate what comes next for me...I'm wrapping up my design stint with Anthropologie this week, getting ready for my trip to frozen Salt Lake City for Alt Summit at the end of the month, and my interior design courses resume next week. I'm not sure if I'll pick up a new internship, and what that might mean for Poppy Haus. I did take a little time away from blogging during December to sit with it and relax with my family. I do know this, I'm excited to have some more freedom to make and share, and I'm ready to get back to it with more regularity and a renewed feeling of creativity. xo, Heather


Friday, August 9, 2013

The Trapeze Planter

Plants are trendy right now, I'm just saying. Inspired by the current interiors of Anthropologie, the amazing San Francisco oddity Paxton Gate and this recent tutorial from Emily Henderson, I've been trying to incorporate more houseplants as decor into our front room.  The space is flooded with natural light, just perfect for green plants and my brown thumb. Today's DIY was a freebie for me; we had all the materials lying around, including these small coconut fiber pots- meant for planting directly into the ground.  As succulents and cacti don't require much watering, you can use these containers as decorative pots for indoor use, just remember they will break down if they are kept damp.  I fashioned this trapeze style planter using one of Wylie's many park sticks, some black and white baker's twine, some fishing wire and a paper punch.  It's pretty self explanatory.  Wrap twine around each end of the stick, tie off and hang; I used push pins because it was so light. Plant the succulents. Punch at either end of the pot, string fishing line through the holes, and tie ends together around the stick.

I got my hands on a fiddle leaf fig (background shot), and some lush ferns- in case you didn't know, these plants are the hot new (prehistoric)plants. Once I get everything planted in fabulous containers I'll do a little botanical reveal for you. xo, Heather 

Friday, March 22, 2013

How To Arrange Grocery Store Flowers

Nothing makes me happier than having pretty fresh flowers in my boy-filled house. At this time of year you can get some very lovely blooms at the grocery store. I asked my favorite floral expert Jen Daily to give us some tips on what to do with them...


Flowers on the table are an easy and inexpensive way to welcome Spring into your home right now. As a former floral designer turned mom-with-little-time, my taste in blooms for the house lean toward the simple and unfussy. Which is why my heart beats a little faster this time of year every time I walk into Trader Joe's. 

I'm waiting for the daffodils.


To me, daffodils embody spring. They are simple, optimistic, and fleeting. And this week they are finally in! Right now ten stems are $1.29 at our market. I bought two bunches, but you would be well served by three or four. Or five. You get my point. If you choose bunches that are just beginning to crack you can watch them as they open up to their full glory, something my boys love to do at our kitchen table. 

In this case, the most difficult thing about displaying your daffodil treasure is selecting an appropriate vase to put them in. You want the daffodils to stand up straight in a close bunch. So choose a vase with an opening that isn't flared or too wide. The vase should be two thirds the height of the daffodils, so trim their stems accordingly. Always trim them at an angle, and put them into room temperature water to encourage hydration. It doesn't get easier than that.


In addition to the daffodil, another Spring bloom that has my heart is the ranunculus. They too are just beginning their season, and are a bargain at $4.99 a bunch. Choose ranunculus if you want a romantic, garden look and you have a few more minutes to spend on them. 

Ranunculus have hairy stems which hold bacteria in the water and make them prone to rot. Always pull off any foliage or stems that will be below the water level, and keep that water level low. Check to see that all stems are in water, and then add an inch. You'll want to refresh the water every day.

Choose a small container about six inches high. I like this rectangular glass one because it makes a one-sided arrangement come together very easily. Cut the ranunculus stems (at an angle) so that the the container is 2/3 to 3/4 of their height. Put them in the vase with the larger blooms in the center, and the smaller blooms at the sides. We are trying to create a loose crescent shape. Save the buds (and any blooms that might break off) for the next step.


For this super easy garden style arrangement I harvested a bit of foliage from our yard. We have both star jasmine and pink jasmine vines, which I love to use for wedding work and at home. The pink jasmine is blooming right now and adds a delicious fragrance, but any type of vine with small leaves will do. I also trimmed a few pieces of camellia. Use what you have.


Add the camellia leaves, (pulling off any leaves that might be below the rim of the vase) a stem or two on each side to build out the crescent shape. Tuck in the buds you saved to fill out the shape.

Next use one length of vine, placing the cut end in water and wrapping the length of it up and over the ranunculus. Secure if needed with a bit of tape to the back of the vase. Easy peasy.


Did you have any broken stems? I did. I put that little beauty in an apothecary jar with a few sprigs of jasmine and camellia, and now its brightening up my bathroom. That makes three arrangements for about $8. And now my house feels and smells like spring, even on this dreary rainy day.


Friday, March 8, 2013

Kitchen Herbs- DIY GIVEAWAY!


I like to grow my own herbs, mostly because they last much longer growing in soil than they do wilting in my refrigerator all week.  I use herbs a lot in cooking; my absolute favorites are cilantro, thyme and oregano, and it just so happens that this is the best time of year to get them going, so I decided to make a kitchen herb garden for my counter top.  You can use these indoor gardens to get seeds started for transplanting outside, or to keep inside by a sunny window.  I like having indoor plants that do something beside look pretty (like my collection of air plants).  To make this sorbet colored kitchen garden I bought three stone colored 6" plastic pots and a matching tray for about $10.  I used wide rubber-bands to divide the pots about 1/3 up, and painted them with two coats of acrylic paint (Martha Stewart: Geranium, Pink Salmon, Neon Orange). I also painted the top 2 inches of three craft sticks with each color to look dipped and wrote the name of the seeds on each before planting using the packets instructions. From across the room they look like little ice cream containers from a Wayne Thiebaud painting. Mmmm.

To enter to win your own kitchen garden, which includes a set of pots painted by yours truly, a drain tray, a set of stick markers and 3 packets of seeds, all you have to do is leave a comment below. I'll announce the winner next Friday. Good luck + happy weekend!  xo, Heather    


Monday, March 4, 2013

What Now


It's the time of the year when I started to get excited about growing a garden, eating lighter, and doing more outside. Our farmer's market is picking up, and springtime is around the corner, which means berries, asparagus, artichokes, and lots of salads. This month I'll be doing a series of posts with a seasonal theme. For today, here's a great guide to know what's in season right now in your neck of the woods. 


We are getting a super late start to planting our garden! I told you I was frazzled.  Having pretty much missed the boat on winter greens, we decided to grow some things will be ready to pluck within a month or two.  This year we're doing raised beds for the bulk of our planting, and we handed over 4 wine barrels for the kids to graze out of.  I planted them some strawberries, blueberries, carrots and Easter Egg radishes. Once they make their way through the carrot barrel we'll put in their favorite cherry tomatoes. Over in our raised beds I'm doing potatoes, nante carrots, snow peas and several varieties of lettuce, which we'll replace with summer squash, melons, and more tomatoes in the coming months. Fingers crossed.


Friday, September 7, 2012

DIY Friday: Patina Planters


I love the mixed metal and mercury glass trend in houswares right now. It gives a vintage patina to the object, no matter how modern it is. For this week's DIY I set out to make some containers that could be used for houseplants, herbs or as a rustic vase. Happy Weekend! Tutorial below.


Gather your materials:

Quart or Gallon sized unused paint can(s)
Hammer
Nail or drill bit (for dimpling)
Gold spray paint
Duct tape


Hammer and or/dimple the can by striking it to achieve desired shape.  Spray paint and allow to dry.


Press duct tape onto the can pulling back gently to release some of the paint.  Brushing any jagged paint until the surface is completely smooth and desired patina is achieved.


Time to plant!  Drill a hole in the bottom if your plants require drainage.  If using as a vase, it might be a good idea to spray a matte coat of sealer to keep the paint intact.


Tuesday, August 21, 2012

Outstanding In Field

From Top Left: Baby charentais melons(a French cantaloupe variety), The family eating at the cedar table handmade by Nicole's husband Phil, Lucie enjoying tomato cobbler, The Martin's lush backyard vegetable garden.

My friend Nicole Martin and her family eat farm to table nearly everyday from the comfort of their own home.  Relocating from Carmel to Sacramento has allowed them to establish a robust backyard garden that yields more than 40lbs of cherry tomatoes each season. One of their favorite dishes to make during the summer months is Martha Stewart's Tomato Cobbler (see recipe below). What impresses me most about their garden is that Lucie and Phoebe are growing up with an understanding of where their food comes from; being able to eat fruit off the vine while playing outside. I imagine they'll want to continue this practice when they grow up. Having recently moved inland myself, I'm hoping to get some tips from Nicole when we put in our raised beds this fall.

Phoebe showing off the star of this season, the baby charentais melon.


Tomato Cobbler
Martha Stewart Living
July 2011
  • For the filling
  • 1/4 cup extra-virgin olive oil
  • 2 medium onions, thinly sliced
  • 4 garlic cloves, thinly sliced
  • 3 pounds cherry tomatoes
  • 3 tablespoons all-purpose flour
  • 1/4 teaspoon crushed red-pepper flakes
  • Coarse salt and freshly ground pepper
  • For the biscuit topping
  • 2 cups all-purpose flour
  • 2 teaspoons baking powder
  • Coarse salt
  • 1 stick cold unsalted butter, cut into small pieces
  • 1 cup grated Gruyere cheese (2 1/4 ounces), plus 1 tablespoon, for sprinkling
  • 1 1/2 cups heavy cream, plus more for brushing

Directions

  1. Make the filling: Heat oil in a large high-sided skillet over medium heat. Cook onions, stirring occasionally, until caramelized, about 25 minutes. Add garlic, and cook until fragrant, about 3 minutes. Let cool.
  2. Toss onion mixture, tomatoes, flour, and red-pepper flakes with 1 1/2 teaspoons salt and some pepper.
  3. Preheat oven to 375 degrees. Make the biscuit topping: Whisk together flour, baking powder, and 1 teaspoon salt in a bowl. Cut in butter with a pastry cutter or rub in with your fingers until small clumps form. Stir in cheese, then add cream, stirring with a fork to combine until dough forms. (Dough will be slightly sticky.)
  4. Transfer tomato mixture to a 2-quart baking dish (2 inches deep). Spoon 7 clumps of biscuit dough (about 1/2 cup each) over top in a circle, leaving center open. Brush dough with cream, and sprinkle with remaining tablespoon cheese. Bake until tomatoes are bubbling in the center and biscuits are golden brown, about 1 hour 10 minutes. Transfer to a wire rack. Let cool for 20 minutes.

Monday, May 7, 2012

Brown Thumb


I learned all about planting succulents this weekend at the CB2 DIY Saturday from the folks at Lila B. a sustainable floral design studio specializing in succulents and carnivorous plants.  It was an informative, interactive event, and I got to take home my own DIY tiny terrarium for about $7 which included soil, rocks and succulents.  


 The session started with a guide to planting succulent container arrangements.  The trick is to select a variety of succulents, some that have height, some that act as ground cover and some that spread and drape over the container as they grow. Start with a container with a hole drilled in the bottom. Apply a small layer of rocks to the base and mix regular potting soil with sand to aid in drainage. Succulents store water in their thick leaves, they do not thrive with a lot of wet soil on their roots.  Pack the plants tightly, and really loosen the roots from pre-potted plants.  Water sparingly. My kind of plant.

For the terrarium, employ the same concept, using rocks on bottom and top layers to hold the soil in place.  With the CB2 terrarium, build the soil up the back side for depth, as the front opening is really shallow (as seen is the second picture). I chose different pups (the offshoots from larger plants) that reminded me of rosettes.

The most helpful tip I learned was to pluck the pups from larger plants, leave them out for the stem to callous over and then replant.  You could have a huge succulent garden in a matter of months.  You can also spiff up your home by planting the pups into cracks in your walkway and concrete walls.  


Related Posts Plugin for WordPress, Blogger...