Showing posts with label Instagram. Show all posts

Tuesday, January 14, 2014

Photo Bomb


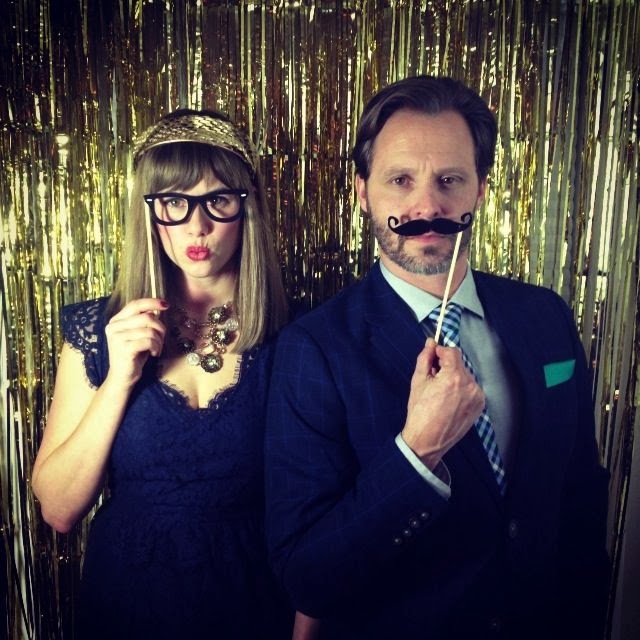
When we get all dressed up and fancy without our kids, as in never, I usually try to take at least one photo to remind myself of my youth, and to use as a totally realistic Facebook profile pic.  I know I'm not alone.

So for Adam's birthday party, I got to work making a photo booth, so that everyone could get a pretty shot of themselves dressed up. I didn't have a professional photographer, and I had to combat the nighttime lighting which can be either too dark or stark/artificial, so I had to think through the easiest way to make it work. I thought I'd share some tips for making a photo booth for evening-time soirees. Academy Awards party?

1. Keep the back ground simple. I love the tutorials for hand painted back drops for daytime parties, but at night, either shiny metallic, sequined or lustrous velvet looks best. This is because of lighting, and formality. I layered three party store gold curtains against a white wall for my booth, inexpensive and easy.

2. Lighting.  It cost me $35 to rent two lights, on stands with umbrellas.  I sourced them from my local camera store. Direct the light at chest height so that it will bounce up to the face. If you do not intend to have a dedicated camera, ask for lights that just remain on, without a strobe.

3. Use Instagram.  Here's why: you can create a hashtag, so that everyone at the party can take their own pictures, pictures that they are happy about and want to share.  At the end of the night you have a cache of party photos of everyone looking their best.  Also, no one has to man the camera, and the tripod won't take up any space/get knocked into.  

4. Suggest a pre-selected filter and hashtag.  For Adam's party, I told everyone to use the X-Pro II, because it made the gold pop, and gave a nice complexion.  The pictures look cohesive, like they were taken with the same camera. I assigned the hashtag #adamis40, and voila.

5. Props. Not everyone has to use them, but they do encourage people to have fun. I'm always a fan of glasses and staches on a stick. Here's my tutorial from last Valentine's day for making your own.  

And there you have it, party on.


Wednesday, October 3, 2012

Coffee Talk


Monday, April 2, 2012

A Pretty Picture

Checking in at The Parker

I took a LOT of pictures on the girls trip this weekend. A big fan of vintage filtered iPhone photography, I had only recently made the switch from exclusively using Hipstamatic to using Instagram.  I got a quick tutorial from a friend who knows how to use it and off I was editing pictures in the field.  I think what makes an app like Instagram so appealing that it gives a novice photographer, a mom at the playground type, the ability to make an ordinary snapshot special.  Using the fading filter can help focus the attention on a specific detail. One thing to know about me is that I do NOT own a nice camera.  I plan on getting one soon, because it's becoming a necessity for my blog. As a result, I have spend some time perfecting my iPhone snapshots.

While in Palm Springs I was keen to take pictures for future stories. I also documented our trip and got some much needed photos of all of our friends, including some glamor shots for everyone to update their Facebook profile. They were really interested in learning how to use Instagram to doctor up their pics, so I thought I'd share my tutorial with you today.

A Girl's Guide to Using Instagram with an iPhone:

There are two ways to use Instagram to edit pictures. 
You can edit a picture you've taken with your phone by opening Instagram and clicking on the camera icon, then click the stacked squares on the left hand side to access your camera roll. Click on the picture you'd like to edit and then move and scale it for editing.  You can also use Instagram to take a picture.  It's pretty straight forward, click the camera icon and point and shoot.  There's a flash and a lens reverse feature on the top bar.  Once you take your shot choose from 18 filters to change the mood of the original.  My favorite thing to do is to use the fade filter located at on the top bar with a teardrop icon. Use the circular fad to focus on a face to blur the background or the bar fade to focus on relevant landscape detail. Once you've decided on a look, tap the green check and share the image if you like or simply tap "done" and the image will save to your camera roll. For reference, check out the color filters and fade of a picture I took of the Saguaro Hotel below. The original is crisp but flat with some unwanted window reflection.  The second is more rich and focuses your attention on the deep rainbow color of the hotel walls. The same is true with the picture of my hilarious friend Annie. When you remove the extraneous detail you reveal the desired focus of the picture. 


Related Posts Plugin for WordPress, Blogger...