Showing posts with label Kids Art. Show all posts

Tuesday, September 9, 2014

Sketching Skills


My two favorite tools are a sharp pencil and a pad of gridded/graphing paper. Whenever I set out to make anything, be it a tiny clay deer sculpture or a floor plan, I make a sketch. It helps me work out my ideas and get down to details. I'm a visual thinker, and both of my kids seem to be as well, so I supply them with their own pads of graph paper to plot out their ideas.  The grids have helped Wylie with scale and consistency while he learns to write his name, and Jasper has used it to make comic books, and has recently started drawing pictures in perspective. Armed with with these simple tools it's pretty amazing to see what they come up with... 


The other day my little lady friend Ella came over (you might recognize her from the weaving project) to check out the new children's architectural book series featured last week. I enlisted her to help me work out a few details for a new class I'll be teaching (more on that soon) where we'll need to know a little about drawing in plan view(2-D) and perspective (3-D). She was really interested in Frank Lloyd Wright's Fallingwater, she loved how his house was built into the natural environment. Using the grids on the page, she sketched out her own design built into nature, a two story tree house, complete with a tire swing. I hope she builds it one day... 


Tuesday, March 18, 2014

DIY Glow In The Dark Stars


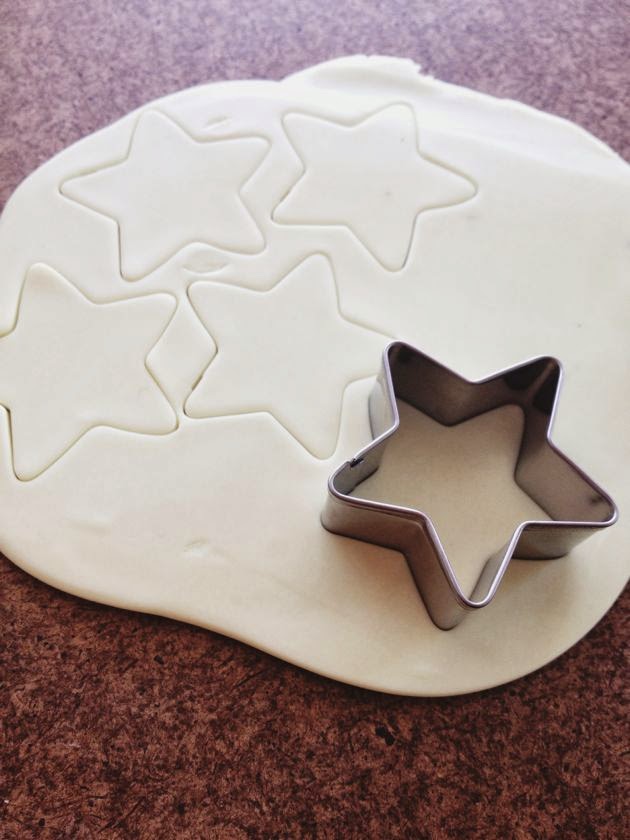
Things are plugging away over here. Thank you for all the kind words about Wylie, and our big news last week. We have our big home and pest inspection today, one of the last major hurdles before we can finally call ourselves homeowners. The boys are starting to get excited about moving, and are already talking about what they want in their new rooms.  Jasper has this cool idea to keep his room white, and paint his ceiling black, for a scatter of glow-in-the-dark stars. I'm totally down with this idea, and I thought we could make it a little more like an art piece and a fun project if we made our own stars with polymer clay.  You can purchase glow-in-the-dark oven bake clay and a set of star cookie cutters at the craft store.  I am using 3M command strips to attach to the ceiling to set them off the ceiling ever so slightly, to give the impression that they are floating in the sky.  Here's the simple tutorial.  


Materials:  

Glow-in-the-dark polymer clay, 1-3" star cookie cutters, command strips, rolling pin, parchment paper or non-food silicone pan liner, sheet pan.


Preheat oven to 275 degrees. On a non-stick surface, roll out clay to 1/8" thickness.  Cut with star shapes and lay on covered sheet pan.  Bake for 30 minutes, remove from oven and allow to cool.


Trim command strips to fit the back of the star, leaving some of the pull tab for damage free removal.


Scatter across the ceiling, make constellations, have fun! They glow brightly when the lights go off, fading gradually after a few minutes. Perfect for bed time. 

Monday, December 16, 2013

Mason Jar Globes


I haven't exactly dropped off the face of the earth, but I am finishing up the semester (finals) and my internship with Anthropologie comes to a close this Friday, which explains why the blog isn't being updated as often lately. I'm a little preoccupied with not knowing what comes next... We have been making things here and there, little after-school projects like these mason jar snow globes, but I've decided to just enjoy my downtime, rather than try to document everything. A few weeks ago I led a children's holiday crafting event at Anthro where we ate cookies and worked on a mason jar globe project. It's an easy to do, elementary school inspired craft, and the kids really loved it, so back at home I made a few more with Jasper. We used some plastic foliage from the craft store to fill the jars. They have a bit of an underwater forest look- totally weird, but rather pretty in the sunlight. Here's the tutorial:


Materials:

Assorted mason jars
Plastic/coated ornaments, or faux flowers and garland
Old fashioned glitter or snow confetti
Hot glue
Liquid glycerin 
Distilled water


Glue the ornamentation to the inside of the jar lid. Hold securely in place until the glue sets.


Add 2-3 pinches of glitter or snow to the jar, then fill the jar with water, leaving a 1 1/2" space at the top for displacement. Add 2-3 tablespoons of glycerin- found in cake supply aisle at craft stores, and insert the lid decor into the jar, sealing with the ring band.  Shake up and you've got yourself a snow globe.


Monday, September 2, 2013

Kind Words


I'm a sucker for pretty concert posters and simple art prints.  They can add a little something to small spaces like a bathroom wall or a kid's room, and I'm totally smitten with this one. I think "Be The Good" is going to be our new family motto. It's from Children Inspire Design, a line of modern, eco-friendly wall art, wall cards, and posters printed on recycled papers using soy based inks.  I extra love this shop because they donate 10% of their sale proceeds to woman and child focused charities. I've run a business before, and 10% is a lot. 

When they reached out to me to let me know about their collection, I thought you guys would really love it so I asked them if they would do a giveaway, and they said YES.  All you have to do is leave a comment at the end of the post and you'll be entered to win your own "Be The Good" poster- I'll notify the winner next Monday.


To enter to win your own "Be The Good" poster simply leave a comment below.  I'll announce the winner  next Monday!
 

Thursday, June 20, 2013

Martha Jr.


I'm over at Playful Learning today with a tutorial on how to make this bracelet! Part of my Martha Stewart experiment, I use her technique to assemble, swapping in round wooden beads and kids crafting stretch cord.  Check out the full post on their blog here.

xo, Heather

Thursday, April 18, 2013

Make Your Own Sidewalk Chalk


Check out my latest project over at Playful Learning. I've always wanted to make my own sidewalk chalk, and I think I may have found the perfect combination of recipes to do it. Summer is coming, check it out!


Monday, March 25, 2013

Make What You Pin


Last week was spring break and we were housebound for a few days because of the rainy weather.  I decided to host a little art party for Jasper and his buddies to prevent cabin fever.  It turns out that little boys are not always so into doing art. Fortunately, I also got a couple of pre-tween girls in the mix who were super excited with what I had to offer which really solidified a few things for me.  1. I still sometimes wish I had a little girl.  Not going to happen, but can we all agree she would probably love growing up with Poppy Haus?  2. I need to start teaching art again.  I did it last year with kindergartners and it was so fun.  So I'm thinking about how I might offer classes to this pre-tween set.  Imagine all the Pinterest projects we could do.  Local people, any ideas?  I also wanted to mention that next month I'm going to explore what's "cool for small".  Thank you to everyone who voted on Facebook!  I'll be doing a whole month of ideas for food, play, and design just for kids.  To get things moving that direction, check out my Pinterest board dedicated to kids art projects. Here's the link. On there you'll see some of the projects we did here, and many more that I can't wait to try. Do you follow Poppy Haus on Pinterest? You totally should. 

Tuesday, September 4, 2012

Dough Boy


I just made my first batch of homemade playdough. This is a kid friendly activity, and Wylie got in on the action. Recipe and tutorial below...


Homemade Playdough
Yields 5 colors

4 cups all purpose flour
2 cups salt
4 cups warm water
4 tbsp canola oil
2 tbsp cream of tartar

+ food coloring

Mix the first five ingredients together in a large pot, then cook over low heat, stirring often until combined and no longer sticky (about 10 minutes).

Transfer to a non-stick surface and allow to cool enough to handle.

Knead until elastic.

Roll the dough and portion into 5 balls, pat into discs, and thumb a well for the food coloring.

USING LATEX or RUBBER GLOVES apply several drops of desired color to the disc.  Fold into the dough, and knead until combined.  This is not a step for little kids, let them handle it after combined.  

Seal in an airtight container.

Tuesday, July 31, 2012

Dog Days and Road Trips

Kids Design Book

When little kids get out of school for summer break it's time for swimming, eating ice cream and hitting the road back seat style.  The change of pace is most welcome, but as much as they don’t want to admit it, with all of that down time, summer can begin to drag (or at least it does at my house). Here are 5 creative activity books and kits to fill the time. 

1. Road Trip Bingo
Long car trips are boring.  Save the movie for later and play bingo.  They can help you spot the highway patrol along the way.

2. This or That- An Activity Book of Choices 
With prompts for list making and drawing,this book will put their schoolwork to use and keep their skills sharp.

3. Little Paper Planes
Designed by a San Francisco artist collective, this book is full of constructible paper planes and crafts. Visualize pretty little planes flying around the backyard.

4. Kid Made Modern
Todd Oldham’s new collection of art supplies and kits are a now a hit at Target stores, but the book they are based on is full of insight into mid-century design and the projects are top notch.

5. Art Lab For Kids
Created by an elementary art teacher, this book has 52 projects in painting, drawing, printmaking and mix-media, inspired by nature and the world around.

Monday, June 11, 2012

Rotate Your Art


I was at West Elm a few weeks ago shopping for our new home when I saw a display in their housewares section that I thought might work for our ever expanding primary art collection.  The idea was simple, plywood, bulldog clips and rope. I'd seen an iteration of this in Martha Stewart Living a few years ago that involve framing wood to create a wall gallery using bulldog clips, but that would be too permanent a solution for our rental.

west elm display


I gathered the materials and made a 4x4 version which we'll put in the kids playroom over their art space when we move.  I varied the heights on the clips to accommodate taller pieces and used several strands of bakers twine braided friendship bracelet style with a loop at the top to create a colorful pop on the unpainted wood; this helped to keep the board more flush with the wall when hung than rope. The board would also look great painted, chalkboard a paint could be an option, as you could write above the piece and the black would pop against the wall. Here's how I did it:

1 4x4 cut of plywood
9 Bully Clips (sourced from Blick)
9 short nuts and bolts
Bakers twine or thin cord


Measure out the placement on your board.  I left a 1" space at the top of the board to accommodate the clip and marked 17" from the top edge (creating 16" of space for art), 12" inches in from the side for my first mark, 12" apart for each clip.  The second row another 16" down and the third row at 12" from the bottom. I drilled the holes and attached the bulldog clips.  Measuring 1" in from each corner I drilled 4 more holes to attach the twine. I then cut 12X 9' strands of twine, stringing 6 strands on each side, braiding the ends and tying into a loop knot at the top of the board for hanging.


Tuesday, June 5, 2012

The Axe


It's Spirit Week at school and today is "career day" meant for adorable little children to dress up like doctors and fire fighters.  Jasper decided that he wanted to be a rock star. This is probably a red flag. 

Last night around 9 o'clock I remembered that I needed to make him a guitar.  You are looking at "The Silver Legacy".  He and I made one of these together a long time ago when it was a featured project in Real Simple Family.  I'll recap my current version:


Gather your stuff...

You will need:

1 small shoe box
4 large, wide rubberbands
1 cardboard tube (from gift wrap)
Aluminum foil
Washi tape (Kid Made Modern from Target in the pic)
Circle stickers 
Clear packing tape 
A marker
An X-ACTO knife or some scissors 


  1. I started by covering the entire shoebox in foil.  I sealed the lid with packing tape.
  2. Trace around the cardboard tube on one end of the box, below the lid.  Make two intersecting cuts across the circle, like a plus sign.
  3. On the box top, trace a large circle and cut out. 
  4. Insert the cardboard tube into the incision.  My tube got a little squished going through the hole, and I trimmed it with scissors through the opening on the box top.
  5. Cover the entire box with clear tape to protect it.
  6. Carefully stretch the rubberbands around the box 
  7. Secure the strings on either end with some washi tape, cover with packing tape.
  8. Decorate the tube with marker, stickers and more tape.  I also covered with clear tape to secure the stickers.

Now it's time to rock.

Monday, May 21, 2012

The Todd


I guess Todd Oldham gave a talk on Alexander Girard at Pratt back in February.  Despite the fact that I live thousands of miles away from Brooklyn, it kind of pains me that I wasn't in the audience. He produced a book on Girard that sits waiting patiently on my Amazon wish list.

At my weekly pilgrimage to the red bullseye I stopped in my tracks; I realized that today was the day.  I found myself in front of the fully stocked Kid Made Modern display.  We don't want for art supplies in this house, but this stuff is rumored to immediately sell out, and I was in the store, if by accident, on launch date.  Somewhere, Alexander Girard is looking out for me.  

I found Oldham's Kid Made Modern at the library one day. I've checked it out and been overdue several times over the last year. It's full of interesting projects and techniques, and gives a little mid-century art history lesson with each chapter. The supplies and kits are based on some of the ideas from the book.  

Here's the loot I got today.  The paint by number kit is by Megan Whitmarsh.


Tuesday, May 8, 2012

Lovin' Spoonful


Warning, spoiler alert if you are a mother in my son's kindergarten class.  I put together a very on trend gift for the kids to make today in art. Inspired by the dipped wood all over Pinterest, I picked up 3 packs of the wooden kitchen utensils at IKEA (at $.49 its a steal).  Using masking tape, I marked the dip line and lightly coated the ends with acrylic paint.  Once dry I tied the set together with baker's twine.  
 

Tuesday, May 1, 2012

Space Craft

Today I paid a visit to The Temescal's East Bay Depot for Creative Reuse.  My art teaching partner and I were on the hunt for a centerpiece for a wire sculptural hanging project that the kids will be doing on Thursday.  I'd stepped into this space before, but I'd never really looked around.  It was amazing. Packed to the gills with jars of vintage knitting needles, bins of tubes, cartons, corks, foil ties, books, frames, typewriters, toys and furniture, it was organized chaos, and everything had potential.  If you are in the Bay Area, its a must see. They are not for profit and take donations, so consider sending your unwanted treasures their way. They may get re-purposed into something cool! I want those knitting needles.


Friday, April 20, 2012

Art Smart


Instagram can make an IKEA paper roller look pretty fancy.  I wanted to share the newest space in my soon to be vacated home.  Not being able to move furniture around and DIY a new wall piece is kind of driving me crazy, so I decided I should start packing!  First thing to go into a box were the ubiquitous backwards facing books on my credenza. I've come to realize this only makes sense on a West Elm display case. It freed up some space for something I've been trying to do for a while.  All of our art supplies are kept downstairs out of necessity, but there's a lot of art happening here and homework requires coloring shapes and drawing pictures to write about.  I needed an art space with the basics. I finally gave up on the old easel (it was a good idea in theory) and bought this low profile paper roller, which has a push down top to easily brace and tear clean sheets.  I put the crayons, colored pencils and canister of glue sticks, sharpeners and rounded scissors on a lacquered tray that can easily be moved to the kitchen table. Spiffy and sensible.


Tuesday, March 27, 2012

Eggs Over Easy


I never noticed that plastic Easter eggs have holes at the top.  Did they always?  I made this garland in about 10 minutes using assorted sizes of eggs in shades of blue and white. They are strung with blue and white baker's twine from Paper Source.  It's so pretty, I think I'll have to make more. 

Friday, March 23, 2012

The Shape of Things


Some of you may know I am a volunteer art teacher in my son's Kindergarten classroom.  I thought I'd share this week's project as it is also a DIY textile printing tutorial.  I found the idea in Todd Oldham's book Kid Made ModernOur Kindergarten class wears plain white T-shirts on their field trips and I thought spiffing them up would make for a fun art project, and it would give me the opportunity to teach them a little about printmaking and textile stamping. This lesson also tied into their recent study of shapes and patterns.  I made the stamps ahead of time, by hot gluing cosmetic sponges (some in patterns) to cardboard backing. We used two textile paint colors to keep it simple.  I spread the paint evenly onto paper plates and taught them how to coat their sponges and press into the fabric. The tees air dried and were heat set with an iron. Here's some of what they came up with.  Go Otters!

Related Posts Plugin for WordPress, Blogger...